Trial of Opengate/OpengateM on VirtualBox
Table of Contents
- 1. Preface
- 2. Usage of the constructed image
- 3. Installation of VirtualBox
- 4. Making of the gateway virtual machine
- 5. Test with a client virtual machine
- 6. Installation of the necessary packages
- 7. Installation of Opengate
- 8. Installation of OpengateM
- 9. Replacing from Virtual Client to Real Client
- 10. When not operate
1 Preface
To try Opengate/OpengateM, one needs to prepare many machines, NICs, and networks. Therefore, we show construction method for trial environment on one PC by using VirtualBox. In addition, we offer a virtual machine image constructed by this procedure.
As the construction on the real machine is very similar, the constructed image and the construction procedure may be useful for the real environment.
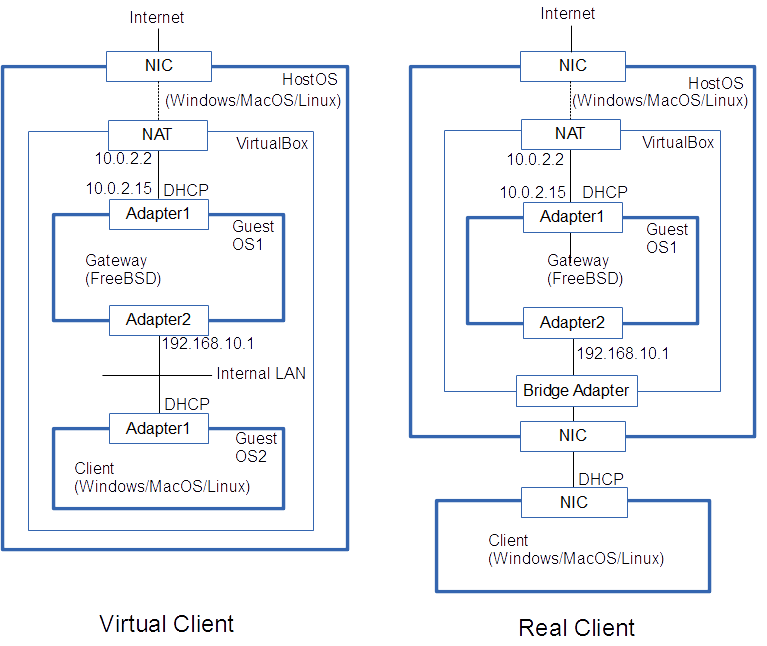
Here, we show the procedure to build the environment of the left-hand figure. Then we show the method for changing the environment to right-hand figure. One can test the environment on one PC without modification of the external environment like the left-hand figure. If the PC has plural NICs, one can test with real terminals like the right-hand figure. The constructed image might be used for the service on a small network, though we do not recommend it.
2 Usage of the constructed image
- The following download directory includes the virtual drive image of the gateway machine which was built in the following installation procedure. Download the file 'opengateYYYYMMDD-disk1.tgz' (YYYYMMDD is a date string) and decompress it.
- Start VirtualBox and make a virtual machine of the downloaded 'vdi' file.
Name: opengate
Type: BSD
Version: FreeBSD(64bit)
Memory Size: 512MB
Hard drive: Use an existing virtual hard drive file > downloaded vid file
- This virtual machine has following users.
userid password root pass-r user1 pass-1 user2 pass-2 user3 pass-3
- To test the environment, two methods are possible, trial with the virtual client and with the real client.
- When accessing an outside URL by a Web browser from the client, the authentication page of Opengate is returned. If authenticated, the network is opened until the Web browser is closed. The page displayed after the authentication has the link to the OpengateM registration page. If registered, the network can be used without password until the expiration day.
- The authentication is set to perform with the local FTP server and recognizes the user mentioned above. The FTP server should be stopped and replaced with appropriate authentication method for long use. The authentiation setting for OpengateM is described in '/etc/opengate/opengatemmng.conf'. And the setting for Opengate is in '/etc/opengate/opengatesrv.conf'. The system supports POP3, LDAP, RADIUS, FTP, PAM, HttpBasic, and Shibboleth.
- In the offered system, both of Opengate and OpengateM are running.
If you want to use one of two, take the following methods.
- Use OpengateM only: Change Captive Portal setting from Opengate to OpengateM.
cd /usr/local/www/apache24/data
cp index.html.var.opengatem index.html.var
- Use Opengate only: Stop the daemon of OpengateM, and comment out the startup description in '/etc/rc.conf'.
opengatemd -e   <= Exit the daemon
--- /etc/rc.conf ---
#opengatemd_enable="YES"
- The domain name is set as 'opengate.example.com'.
Outside email server may refuse mail, if the domain name is informal.
To change the domain name, modification is needed in the following files.
And 'make install' might be needed in the mail directory.
/etc/rc.conf
/etc/hosts
/etc/mail/access
/var/unbound/unbound.conf
/usr/local/etc/dhcpd.conf
/usr/local/etc/apache24/httpd.conf
/etc/opengate/opengatesrv.conf
/etc/opengate/opengatemmng.conf
- A program source of Opengate/OpengateM is presented in the home of user 'user1'.
From the next section, we show the procedure for building the system from the beginning. Most commands should be executed on the 'root' user.
3 Installation of VirtualBox
Obtain a binary corresponding to the host OS from the download site of VirtualBox and install it. The installation procedure is simple. Refer to other sites for the details. We used 'VirtualBox-4.3.28-100309-Win.exe'.
4 Making of the gateway virtual machine
This section describes the procedure for basic setting of gateway virtual machine where Opengate/OpenateM work.
4.1 Installation of FreeBSD
- Obtain a file from the download site of FreeBSD. We used 'FreeBSD-10.1-RELEASE-amd64-disc1.iso'.
- Start VirtualBox.
Choose 'New' and make a virtual machine of FreeBSD having the following setting.
Name: opengate
Type: BSD
Version: FreeBSD(64bit)
Memory Size: 512MB
Hard drive: Create a virtual hard drive now > VDI > Dynamically allocated > 10GB
- Choose 'Start' and select the downloaded ISO file for 'start-up disk'. (by clicking the right-side folder icon). Use 'host key'(Right-Control) to change the mouse control from guest OS to host OS.
- Install the OS according to following instructions.
Installation or live CD > Install
Keymap > Japanese106 > Continue
Hostname > opengate
Partitioning > Auto(UFS) > Entire Disk > Finish > Commit
Archive Extraction
Root Password > pass-r
Network Conf > em0 > IPv4=Yes > DHCP=Yes > IPv6=Yes
local or UTC > No
Time Zone > Asia > Japan > JST=Yes
System Configuration > Default
Add User > yes
user > user1
Final Config > Exit > Manual=No > Reboot
- Shutdown the virtual machine and take off ISO file.
Settings > Storage > FreeBSDxxxx.iso > right-click > Remove Attachment
- Click 'Start' after changing the following.
Settings > Network > Adapter 1 > Attached to = NAT
Settings > Network > Adapter 2 > Enable Network Adapter > Attached to = Internal Network
- Log in with 'root' user.
Confirm that 'em0' and 'em1' exist and that packets pass from the gateway to the outside network.
ifconfig
ping www.osdn.jp
But the communication between the host OS and guest OS is impossible. If the communication is necessary, make network adapter 3 as 'Host-only Adapter'.
4.2 Setting of the router
- In '/etc/rc.conf', set fixed address '192.168.10.1' to 'em1' connecting to the internal network.
Also set NAT, routing and a firewall (full open).
--- /etc/rc.conf ---
ifconfig_em1="inet 192.168.10.1 netmask 255.255.255.0"
gateway_enable="YES"
firewall_enable="YES"
firewall_type="OPEN"
natd_enable="YES"
natd_interface="em0"
- Reboot and Confirm IP addresses of 'em0' and 'em1'.
reboot
ifconfig
4.3 Setting of DNS
- The DNS cashe server is set up by using 'unbound' included in FreeBSD 10.
Edit '/etc/rc.conf' as follows.
--- /etc/rc.conf ---
local_unbound_enable="YES"
- Perform automatic setting by the following command.
service local_unbound start
- Confirm the automatic setting.
/var/unbound/forward.conf
/var/unbound/lan-zones.conf
/var/unbound/unbound.conf
/etc/resolvconf.conf
/etc/resolv.conf
- Add the following to /var/unbound/unbound.conf (at the end of the 'server:' section) and reboot.
--- /var/unbound/unbound.conf ---
interface: 127.0.0.1
interface: 192.168.10.1
access-control: 127.0.0.1/32 allow
access-control: 192.168.10.0/24 allow
local-data: "opengate.example.com. IN A 192.168.10.1"
local-data-ptr: "192.168.10.1 opengate.example.com."
4.4 Inatallation of DHCP
- DHCP Package is installed using the 'pkg' system.
If the 'pkg' system is not yet initialized, execute the following command.
pkg update
- Search a DHCP package and install it.
pkg search dhcp
pkg install isc-dhcp43-server
- Add the following to '/etc/rc.conf'.
The value 'ifaces' is the interface name to which the DHCP server distributes information.
--- /etc/rc.conf ---
dhcpd_enable="YES"
dhcpd_flags="-q"
dhcpd_conf="/usr/local/etc/dhcpd.conf"
dhcpd_ifaces="em1"
dhcpd_withumask="022"
dhcpd_withuser="dhcpd"
dhcpd_withgroup="dhcpd"
- Edit the configuration file '/usr/local/etc/dhcpd.conf' as follows.
Also edit the other items if you need.
--- /usr/local/etc/dhcpd.conf ---
option domain-name "example.com";
option domain-name-servers 192.168.10.1;

default-lease-time 600;
max-lease-time 7200;
log-facility local7;

subnet 192.168.10.0 netmask 255.255.255.0 {
        range 192.168.10.2 192.168.10.254;
        option routers 192.168.10.1;
        option broadcast-address 192.168.10.255;
}
The basic setting of the gateway is finished. Reboot, confirm setting and power off the gateway.
5 Test with a client virtual machine
- A new client virtual machine is created. We used 'vdi' file of the PC-BSD, 'PCBSD10.1.2-x64-consumer-desktop.vdi', but you can use other OSs which can run on VirtualBox.
- Start VirtualBox.
Select 'New' and make a virtual machine for FreeBSD, using the following setting.
Name: client1
Type: BSD
Version: FreeBSD(64bit)
Memory Size: 1024MB
Hard drive: Use an existing virtual hard drive file > select downloaded vid file
- As a default, the NAT connected to the outside network is prepared. Confirm the communication to the outside network by using 'ping' and a Web browser.
- If success, change the connection to the internal network.
Settings > Network > Adapter 1 > Atached to = Internal Network
- Confirm that communication from the client virtual machine to the outside network is possible by using 'ping' or a Web browser. In the case of the gateway with Opengate/OpengateM, 'ping' does not pass, and an authentication page is given back to Web access. Without Opengate/OpengateM, 'ping' and Web access normally pass through the gateway.
- When packets cannot pass the gateway, confirm the following.
For the gateway with Opengate/OpengateM, refer also to (10).
- Of course, the gateway virtual machine should be activated earlier than the client virtual machine.
- Firstly, confirm the network setting of the client virtual machine is right by using 'ifconfig'.
IP address=192.168.10.2
default router=192.168.10.1
subnet mask=255.255.255.0
- When a value of these network setting is abnormal, it may be a mistake of the DHCP.
- Confirm the network setting of the gateway virtual machine and client virtual machine.
- Start DHCP on the gateway, and check the error message.
/usr/local/etc/rc.d/isc-dhcpd start
- If dhcpd is started normally, reboot the client and acquire information again.
- If the above is normal, does 'ping' reply when appointed an internal network side IP address of the gateway?
When not reply, check the network setting of VirtualBox and FreeBSD.
ping 192.168.10.1
- If the above is normal, does 'ping' reply when appointed the IP address of the outside network beyond the gateway?
When not reply, check the setting of routing.
ping 202.221.179.11
- If the above is normal, does 'ping' reply when appointed the domain name of the outside network?
When not reply, check the setting of DNS.
ping www.osdn.jp
6 Installation of the necessary packages
In this section, we install the packages that are necessary for the operation of Opengate/OpengateM.
6.1 Installation of Apache
- search a package of Apache and install it in the gateway virtual machine.
pkg search apache
pkg install apache24
- Start Apache by the following command.
service apache24 onestart
- Access the gateway machine (192.168.10.1) from the client machine by using a Web browser, and confirm the normal response.
- Add startup of Apache to '/etc/rc.conf'.
--- /etc/rc.conf ---
apache24_enable="YES"
- Edit configuration file '/usr/local/etc/apache24/httpd.conf' as needed.
Set the gateway machine name (opengate.example.com) to the parameter 'ServerName'.
--- /usr/local/etc/apache24/httpd.conf ---
ServerName opengate.example.com:80
- Prepare the Apache SSL (Self-signed certificate) by the following procedure.
- Create private key 'server.key', CSR file 'server.csr', and server certificate 'server.crt'.
cd /usr/local/etc/apache24
openssl genrsa 2048 > server.key
openssl req -new -key server.key > server.csr
openssl x509 -days 3650 -req -signkey server.key < server.csr > server.crt
- In Apache configuration file '/usr/local/etc/apache24/httpd.conf', remove the left-side comment mark '#' as follows.
--- httpd.conf ---
LoadModule socache_shmcb_module libexec/apache24/mod_socache_shmcb.so
LoadModule socache_dbm_module libexec/apache24/mod_socache_dbm.so
LoadModule socache_memcache_module libexec/apache24/mod_socache_memcache.so
LoadModule ssl_module libexec/apache24/mod_ssl.so

Include etc/apache24/extra/httpd-ssl.conf
- Also revise Apache SSL configuration file '/usr/local/etc/apache24/extra/httpd-ssl.conf'.
--- httpd-ssl.conf ---
<VirtualHost _default_:443>
DocumentRoot "/usr/local/www/apache24/data"
ServerName opengate.example.com:443
ServerAdmin you@example.com

SSLCertificateFile "/usr/local/etc/apache24/server.crt"
SSLCertificateKeyFile "/usr/local/etc/apache24/server.key"
- Create private key 'server.key', CSR file 'server.csr', and server certificate 'server.crt'.
- Restart Apache and confirm that Web access (without/with SSL) is possible from the client machine.
service apache24 restart
6.2 Installation of PHP
- With 'pkg' system, install PHP and mod_php.
pkg search php
pkg install php5
pkg install mod_php5
- There are sample files 'php.ini-development' and 'php.ini-production' in 'usr/local/etc'.
Create 'php.ini' from either of two.
cd /usr/local/etc
cp php.ini-development php.ini
- Set 'timezone' in '/usr/local/etc/php.ini'.
--- /usr/local/etc/php.ini ---
[Date]
date.timezone = "Asia/Tokyo"
- Confirm the execution of php.
php -r "echo test;"
- Revise Apache configuration file '/usr/local/etc/apache24/httpd.conf' for co-working with PHP, and restart Apache.
--- /usr/local/etc/apache24/httpd.conf ---
LoadModule php5_module  libexec/apache24/libphp5.so

<IfModule mime_module>
  AddType text/html .php
</IfModule>

<FilesMatch "\.php$">
  SetHandler application/x-httpd-php
</FilesMatch>
- Put the following files in DocumentRoot of Apache, and access it by a Web browser to confirm the cooperation of PHP.
Delete it after confirmation.
--- DocumentRoot/phpinfo.php ---
<?php phpinfo(); ?>
6.3 Installation of MySQL
- If OpengateM is not necessary, you can skip this section, because MySQL is not used in Opengate.
- With 'pkg' system, add MySQL client function.
If you use the DB server locally, add the server function of MySQL.
pkg search mysql
pkg install mysqlxx-server
pkg install mysqlxx-client
- Activate MySQL server function in '/etc/rc.conf'.
--- /etc/rc.conf ---
mysql_enable="YES"
- Initialize MySQL.
/usr/local/etc/rc.d/mysql-server onestart
- Confirm the execution of MySQL.
mysql
mysql> quit
6.4 Installation of SQLite3
- With 'pkg' system, Install SQLite3.
pkg search sqlite3
pkg install sqlite3
- Confirm the execution of SQLite3.
sqlite3
sqlite> .quit
A standard gateway machine has been settled here. We recommend that you should install Opengate after the confirmation of standard gateway operation.
7 Installation of Opengate
Opengate and OpengateM can be used together. Or each one can be used alone. When you want to use OpengateM only, skip this section.
7.1 Acquisition and make of Opengate
- Acquire a source archive of Opengate.
Here we acquire it by using a text Web browser 'lynx'.
We recommend the newer archive in the file list.
pkg search lynx
pkg install lynx
lynx http://opengate.osdn.jp/download
- Move to the working directory '/home/user1' and unpack the archive of Opengate.
mv opengatexxx.tar.gz /home/user1
cd /home/user1
tar xzvf opengatexxx.tar.gz
- The following directories are included in the source archive.
Directory Description conf configuration file, firewall script doc documentation ezxml XML parser (copyright Aaron Voisine) javahtml javascript program, HTML files opengatesrv server CGI programs tools additional tools
- Modify opengatexxxx/opengatesrv/Makefile.
If 'WWWDIR' is different from the real directory of Apache, change it (for example, from apache22 to apache24).
--- opengatexxx/opengatesrv/Makefile ---
WWWTOP = /usr/local/www/apache24
- Compile and install it in the 'opengatexxxx/opengatesrv' directory.
cd opengatexxx/opengatesrv
make clean
make install
7.2 Editing of the Opengate configuration file
- The sample configuration file '/etc/opengate/opengatesrv.conf.sample' is prepared.
Copy it to '/etc/opengate/opengtesrv.conf', and modify it.
cd /etc/opengate
cp opengatesrv.conf.sample opengatesrv.conf
vi opengatesrv.conf
- Following parts should be changed.
--- /etc/opengate/opengtesrv.conf ---
<OpengateServerName>opengate.example.com</OpengateServerName>

<AuthServer>
    <Protocol>pop3s</Protocol>
    <Address>192.168.0.2</Address>
</AuthServer>
- The tag <OpengateServerName> means the hostname(FQDN) or the IP address of the server. Here, we use 'opengate.example.com'. When using the IPv6 function, the FQDN needs to retrieve both of IPv4 and IPv6 addresses.
- The tag <AuthServer> means the authentication server.
Various authentication protocols are supported. Refer to the configuration file for the details.
To eliminate the problem of the authentication server, try the following setting firstly.
In this setting, all authentication are passed.
--- /etc/opengate/opengtesrv.conf ---
<AuthServer>
    <Protocol>accept</Protocol>   <!-- **** DO NOT USE THIS IN SERVICE MODE **** -->
</AuthServer>
- The configuration file is the XML form.
The comment is as follows.
The mark # does not mean comment.
<!-- Comment String -->
- Opengate can switch the authentication depending on the pattern of 'userid@extid'. You can prepare plural authentication servers for each management sections and for guests. The details are described in the configuration file.
- The secondary server can also be indicated, which is used when first server does not response.
- Do not delete IPv6-related setting, though it is needless.
7.3 Setting of Apache
In '/usr/local/etc/apache24/httpd.conf', set up the following.
- In Opengate, the gateway forwards any HTTP request to the local Web server, and returns the authentication page.
To reply to any URL, set 'HTTP_ERROR 404 (File Not Found)' as DocumentRoot.
--- /usr/local/etc/apache24/httpd.conf ---
ErrorDocument 404 /
- Admit the CGI operation in the 'cgi-bin' directory.
And validate the loading of 'mod_cgi' (remove the comment mark).
--- /usr/local/etc/apache24/httpd.conf ---
<Directory "/usr/local/www/cgi-bin">
 ...
  Options ExecCGI
 ...
</Directory>

LoadModule cgid_module libexec/apache24/mod_cgid.so
LoadModule cgi_module libexec/apache24/mod_cgi.so
- Validate the handlers of 'cgi' and 'var'.
And validate the loading of 'mod_negotiation' (remove the comment mark).
--- /usr/local/etc/apache24/httpd.conf ---
AddHandler cgi-script .cgi
AddHandler type-map .var

LoadModule negotiation_module libexec/apache24/mod_negotiation.so
- Add 'index.html.var' to 'DirectoryIndex'.
--- /usr/local/etc/apache24/httpd.conf ---
DirectoryIndex index.html.var index.html
- When character code is abnormal, comment out the setting of the character set.
--- /usr/local/etc/apache24/httpd.conf ---
#AddDefaultCharset ISO-8859-1
- When the message "Failed to enable the 'httpready' Accept Filter" appears, describe the following in /boot/loader.conf.
--- /boot/loader.conf ---
accf_http_load="YES"
7.4 Setting of ipfw
You must describe the firewall rules adequately for the proper working of Opengate. It is desirable to set up the firewall rules suitable for the your network management. The firewall 'ipfw' controls both of IPv4 and IPv6.
For each of the authenticated terminal, Opengate inserts permission rule (rule number: 10,000-40,000). A forwarding rule for the Web packet settles at the low priority position (rule number 60,000). Therefore, the packet which is matched to a permission rule passes the gateway. The Web packet which do not match to the permission rules is forwarded to the authentication page. Other is refused.
- Copy this to '/etc/opengate/rc.firewall' and revise the addresses.
The variables 'ixxx' are parameters for the inner network (terminal-side) and the variables 'oxxx' are for the outer network (Internet-side).
The following is the setting of our example.
When you do not use the IPv6, set localhost for the IPv6 (onet6=inet6="0", oip6=iip6="::1").
cd /etc/opengate
cp rc.firewall.sample rc.firewall
--- /etc/opengate/rc.firewall ---
oif="em0"
onet="10.0.2.0"
omask="255.255.255.0"
oip="10.0.2.15"
onet6="0"
oprefixlen6="64"
iif="em1"
inet="192.168.10.0"
imask="255.255.255.0"
iip="192.168.10.1"
inet6="0"
iprefixlen6="64"
iip6="::1"
- Change firewall setting in '/etc/rc.conf' as follows.
After the restart, the firewall is closed in default.
To open the firewall in default, remove the comment (#) on 'firewall_type', and add the comment to 'firewall_script'.
--- /etc/rc.conf ---
firewall_enable="YES"
#firewall_type="OPEN"
firewall_script="/etc/opengate/rc.firewall"
- The directory '/etc/opengate' has another file 'ipfwctrl.pl.sample'. This is a perl script for the exceptional control of ipfw, but does not usually use it. Most control can be done by the combination of the ipfw rules. If it is impossible, examine the use of the perl script.
7.5 Setting of syslog
- Set the following in '/etc/syslog.conf'.
The 'syslog' system records the messages to the indicated file.
--- /etc/syslog.conf ---
local1.*   /var/log/opengate.log
         ^ Divided by TAB codes
- Create the log file.
Because the file becomes large with time, appropriate log rotation or deletion should be prepared.
touch /var/log/opengate.log
7.6 Operation check
- Reboot to enable the setting. When you access the outer Web site from the client machine on the inner network, the authentication page is shown. When the authentication succeeds, the page including a yellow-bar is shown. While this page opens, the network is opened. The network is closed when the page is closed.
- When not work adequately, refer to (10). Also refer to the Opengate homepage.
7.7 Modification of the Web page
- When you want to change the Web pages, revise the files in the 'opengate' directory under the DocumentRoot. These files are templates. CGIs send the files to the client after rewriting the variables such as '%%XXX%%'. The relative URL description is invalid in httpkeep.html (Describe it in full path).
7.8 Setting of SQLite3
- Opengate uses the SQLite3 database to maintain session information.
The tag <SqliteDb> in the configuration file '/etc/opengate/opengatesrv.conf' indicates the position of the database file.
It is desirable to change it in an appropriate directory.
The user WWW needs to write into this directory.
--- /etc/opengate/opengatesrv.conf ---
<SqliteDb>/home/sqlitedb/opengate.db</SqliteDb>
--- shell commands ---
mkdir /home/sqlitedb
chown www /home/sqlitedb
- The SQLite3 database and the table are created automatically.
Because the database file becomes large with time, the file compression or deletion should be executed regularly.
Following is an example script to delete the old records.
#!/bin/sh
echo "delete from session where closeTime < datetime('now','localtime','-3days');" | sqlite3 /tmp/opengate.db
exit 0
7.9 Installation of rulechk
- This installation is optional. When a process of Opengate is terminated abnormally, the permission rules of the firewall might remain. If the case occurs, use the prepared script in tools/rulechk. This tool compares a list of firewall rules with a list of Opengate processes, and deletes the unnecessary rules. Execute from the console or from 'cron'.
8 Installation of OpengateM
When you want to use Opengate only, skip this section.
- OpengateM consists of a daemon and management programs.
Program name Description Installation site opengatemd Packet check daemon All gateways opengatemown/fwd.cgi Registration page for Web terminals All gateways opengatemchk/reg.cgi Registration page for non-Web terminals Gateways in management section opengatemup.cgi Updating page A management server opengatemmail Program to send warnig mail A management server MySQL Management database A management server - Usually the registration and update of user terminals are executed by the user oneself with a Web browser.
- The terminals having no Web browser are registered by the intervention of the manager (administrator). You can exclude non-Web terminals from service, when the manager cannot bear the registration work (In this case, installation of opengatemchk/reg.cgi is needless).
- The table also shows the installation sites. Here we install all programs into one machine.
8.1 Acquisition of OpengateM
- Acquire a source archive of OpengateM.
Here we acquire it by using the text Web browser 'lynx'.
We recommend the newer archive in the file list.
pkg search lynx
pkg install lynx
lynx http://opengatem.osdn.jp/download
- Move to the working directory '/home/user1' and unpack the archive of OpengateM.
mv opengatemxxx.tar.gz /home/user1
cd /home/user1
tar xzvf opengatemxxx.tar.gz
- The following directories are included in the source archive.
Directory Description conf configuration file, firewall script doc documentation ezxml XML parser (copyright Aaron Voisine) html HTML files mdsrc daemon program mngsrc management programs phpsrc additional PHP programs rc.d startup script sqlscript MySQL scripts
8.2 Installation of daemon 'opengatemd'
- Install the daemon from 'mdsrc' directory of the archive.
cd opengatemxxx/mdsrc
make install
- If 'opengatemd' is running, the installation fails.
In this case, stop temporarily and install it as follows.
opengatemd -s  <= stop
make install   <= install
opengatemd     <= restart
- Files are added to the following places in default.
/usr/local/bin/opengatemd             <= execution file
/etc/opengate/opengatemd.conf.sample  <= configuration file
/etc/rc.d/opengatemd                  <= startup script
- The sample configuration file '/etc/opengate/opengatemd.conf.sample' is prepared. Copy it to '/etc/opengate/opengtemd.conf', and modify it.
cd /etc/opengate
cp opengatemd.conf.sample opengatemd.conf
The tags to be modified are MySQL (MySqlDb/Server, User,Password), and the packet capture device (Pcap/Device). Refer to the configuration file for the details.
--- /etc/opengate/opengatemd.conf ---
<MysqlDb>
  <Server>localhost</Server>
  <User>root</User>
  <Password></Password>
  ...
</MysqlDb>

<Pcap>
  <Device>em1</Device>
  ...
</Pcap>
- Set the following in '/etc/sysctl.conf' to enable 'ipfw' in Layer2.
--- /etc/sysctl.conf ---
net.link.ether.ipfw=1
8.3 Installation of management programs
- Install the management programs at the directory 'mngsrc'.
If 'WWWTOP' in Makefile is different from the Apache directory, revise it.
cd opengatemxxx/mngsrc
make install
If you want to install the programs individually, execute as follows.
cd opengatemxxx/mngsrc
make installmreg  <= opengatemchk/reg.cgi
make installmup   <= opengatemup.cgi, opengatemmail
make installmown  <= opengatemown/fwd.cgi
- The sample configuration file '/etc/opengate/opengatemmng.conf.sample' is prepared. Copy it to '/etc/opengate/opengtemmng.conf', and modify it.
cd /etc/opengate
cp opengatemmng.conf.sample opengatemmng.conf
The tags to be modified are <Device>(network interface name), <MySqlDb>(MySQL setting), <AuthServer>(the authentication method) at least. If <DocumentRoot>(Apache document directory) is different from the real directory, change it (for example, from apache22 to apache24).
In the following example, the network interface name is 'em1', the authentication is 'POP3S', and MySql without password is located in localhost. The two users 'user1' and 'user2' are recognized as the managers (administrators).
--- opengatemmng.conf ---
<Device>em1</Device>

 <MySqlDb>
  <Server>localhost</Server>
  <User>root</User>
  <Password></Password>
  <Database>opengatem</Database>
 </MySqlDb>

 <AuthServer>
  <UserType>admin</UserType>
  <Protocol>pop3s</Protocol>
  <Address>192.168.10.1</Address>
  <AcceptUsers>user1 user2</AcceptUsers>
 </AuthServer>

 <AuthServer>
  <Protocol>pop3s</Protocol>
  <Address>192.168.10.1</Address>
  <MailDomain>opengate.example.com</MailDomain>
 </AuthServer>
- To eliminate the problem of the authentication server, try the following setting firstly.
In this setting, all authentication are passed.
<Protocol>accept</Protocol> <!-- **** DO NOT USE THIS IN SERVICE MODE **** -->
- The authentication is set independently for both of 'the managers(administrators)' and 'the general users'. The authentication for the manager is unnecessary when you exclude non-Web terminals from service.
- Authentication protocols are POP3, FTP, LADIUS, LDAP, PAM, Shibboleth, and HttpBasic. You can use the same protocol and server for both of the manager and the general user (except HttpBasic and Shibboleth).
- The tag <MailDomain> is the default domain of the warning mail. The default mail address at registration are created from this value and UserID. In case of Shibboleth, use the tags <UidAttribute> and <MailAttribute> that are the environmental variables assigned by Shibboleth.
- When you use HttpBasic or Shibboleth, add the following description to '.htaccess' of the directory including CGIs.
In addition, validate 'AllowOverride' and 'Require' in httpd.conf.
In the case of the other authentication methods, no description is needed in '.htaccess'.
--- .htaccess ---
<FILES opengatemchk.cgi>
AuthType Basic
AuthUserFile /tmp/passwd.dat
AuthName "Admin"
Require valid-user
</FILES>

<FILES opengatemreg.cgi opengatemown.cgi opengatemup.cgi>
AuthType shibboleth
ShibRequestSetting requireSession 1
ShibRequireSession On
ShibUseHeaders On
Require valid-user
</FILES>
- HttpBasic cannot be used simultaneously for both authentications . Also Shibboleth cannot be used for both.
8.4 Setting of the MySQL
- Create tables as follows (once after installation).
cd opengatemxxx/sqlscript
mysql < createtablescript
- Create the NIC vendor table (*If you exclude non-Web terminals, it is needless).
Download the vendor list 'oui.txt' from IEEE and put it in the directory same as a PHP program.
Then, with 'updatevendortable.php', stores data of 'oui.txt' on the MySQL table
(The MySQL table can be created directly from the IEEE data.
But we take the above method to cope with the download trouble easily).
cd opengatemxxx/phpsrc
fetch http://standards.ieee.org/develop/regauth/oui/oui.txt
php < updatevendortable.php
- Basically, the user oneself performs the MAC address registration of own terminals at the time of the use.
However, for the case of batch registration, a script is prepared.
It is executed as follows, though usually it is not necessary.
cd opengatemxxx/sqlscript
vi insertmacscript
mysql < insertmacscript
8.5 Setting of Apache, ipfw, and syslog
- If you skipped the installation of Opengate, set up Apache, ipfw, and syslog here, using the description of the 'Installation of Opengate'.
8.6 Activation of the daemon
- Start the daemon and try access from the terminal connected in the inner network.
The daemon is started by the command 'opengatemd' of the root user.
After starting the daemon, the permitted access passes the gateway.
Otherwise, at Web access, the authentication is demanded, and registration page is displayed.
The command parameters are as follows.
command description opengatemd startup opengatemd -e end (finish after closing all) opengatemd -s stop (keep opening states intact) opengatemd -r reset (reboot the daemon) opengatemd -c console mode (run on a shell)
- Add the following into '/etc/rc.conf' to start the daemon automatically.
--- /etc/rc.conf ---
opengatemd_enable="YES"
- To perform reboot every day, add the following contents to '/etc/crontab' (reboot every morning at 3:48 in this example).
Or prepare the file to carry out the command in the directory '/etc/periodic/daily'.
--- /etc/crontab ---
48      3       *       *       *       root    /usr/local/bin/opengatemd -r
8.7 Setting of the expiration warning mail
- For the test of dispatching a mail, revise 'opengatemxxx/sqlscript/insertmacscript', and register a terminal which is expired tomorrow.
--- opengatemxxx/sqlscript/insertmacscript ---
insert into opengatem.macaddrs values(
      '01:23:45:67:89:ab',
      'A',
      'iPad2',
      'user1',
      '',
      'user1@opengate.example.com',   <= user's mail address
      now(),
      now(),
      adddate(now(), interval 1 day));   <= tomorrow is the expiration day
-----------------------
mysql < insertmacscript
- There is a sample of the warning email '/etc/opengate/warningmail.sample'. Copy this into '/etc/opengate/warningmail' and edit it. The variables '%%DEVICENAME%%' and '%%LIMITDATE%%' are replaced with proper values by the program 'opengatemmail'.
- Execute the command 'opengatemmail' with root user. Then the warning mail arrives. If the mail does not arrive, confirm 'opengate.log' or 'maillog'. When the sender address is not a formal domain name, it may be refused by the outer mail server. With the upper sample, we send the mail to the local server.
- The parameters about mail send can be modified in the configuration file '/etc/opengate/opengatemmng.conf'.
- Add the following to '/etc/crontab' in order to dispatch the warning mail.
This sample dispatch the mail every day at 07:46. The mail is sent to the user whose terminal is expired soon.
Or prepare the file to carry out the command in the directory '/etc/periodic/daily'.
When you manage plural gateways and management server, it should be set in a single site.
Plural emails will arrive, when set in plural sites.
--- /etc/crontab ---
46      7       *       *       *       root    /usr/local/bin/opengatemmail
8.8 Setting the Link of CGIs
- Access the URL of CGIs from a client in the inner network by a Web browser and confirm the action.
http://opengate.example.com/cgi-bin/opengate/opengatemown.cgi
http://opengate.example.com/cgi-bin/opengate/opengatemup.cgi
http://opengate.example.com/cgi-bin/opengate/opengatemchk.cgi
The CGI 'opengatemreg.cgi' is called from 'opengatemchk.cgi'. The direct access is refused.
- The CGI 'opengatemup.cgi' is an update program usable from any terminal.
Therefore, link it to the places easy to find, such as the top page of management section.
This URL is also described in the warning mail.
<a href=https://opengate.example.com/cgi-bin/opengate/opengatemup.cgi?lang=en>OpengateM(English)</a>
<a href=https://opengate.example.com/cgi-bin/opengate/opengatemup.cgi?lang=ja>OpengateM(Japanese)</a>
- The CGI 'opengatemown.cgi' is accessed by user oneself with the terminal that the user wants to register/update.
This program recognizes the MAC address of the client and works.
- In the case of the combination with Opengate, arrange the link in the page 'httpkeep.html' which is displayed after the authentication of Opengate.
<a href="https://opengate.example.com/cgi-bin/opengate/opengatemown.cgi?lang=%%LANGUAGE%%&redirectedurl=%%REDIRECTEDURL%%" >OpengateM</a>
- In the case of the stand-alone use of OpengateM, set as Active Portal.
For this purpose, copy 'index.html.var.opengatem' to 'index.html.var' in the DocumentRoot directory.
cd /usr/local/www/apache24/data
cp index.html.var.opengatem index.html.var
By setting of ipfw and Apache, the Web access from the denied terminal is forwarded from 'index.html.var' to 'opengatemown.cgi'.
- In the case of the combination with Opengate, arrange the link in the page 'httpkeep.html' which is displayed after the authentication of Opengate.
9 Replacing from Virtual Client to Real Client
- If the installed PC has two NIC, you can connect real clients to the second NIC.
- To perform this, change the network setting of the gateway virtual machine in VirtualBox as follows.
Settings > Network > Adapter 2> Attached to = Bridged adapter, Name = Name of second NIC
- Turn off DHCP in the host OS for the network adaptor corresponding to the adapter 2. In the DHCP automatic setting, routing might be confused, because the default router of this side is distributed by DHCP.
10 When not operate
- At first, confirm independently the correct execution of related software , such as Apache, MySQL, PHP, and ipfw. And confirm those log files.
- When the authentication does not pass, set the tag <AuthServer>/<Protocol> as 'accept' in the configuration file of Opengate/OpengateM. If cured, the problem of the authentication server side is suspected.
- When the network is improper, set 'ipfw' as default-open and examine (remove comment mark at 'firewall_type' and add comment mark at 'firewall_script' in '/etc/rc.conf').
- Opengate/OpengateM puts log into '/var/log/opengate.log'. Refer at the error. A large quantity of log is put out, when you set the tag <Debug> as '2' in the configuration file.
- There are configuration files in '/etc/opengate'.
Confirm points needed to modify.
File name Description opengatesrv.conf configuration of Opengate opengatemd.conf configuration of OpengateM daemon opengatemmng.conf configuration of OpengateM management programs rc.firewall rule set of ipfw warningmail sample of warning mail
- You can do the 'debug-print' by using the function 'err_msg()'. The function works same as 'printf()', though it puts out message to syslog. Refer to the sample code in the program source.
Please send Demands/Questions about this page to the following address.
Yoshiaki Watanabe, Email: watanaby(at)users.osdn.jp